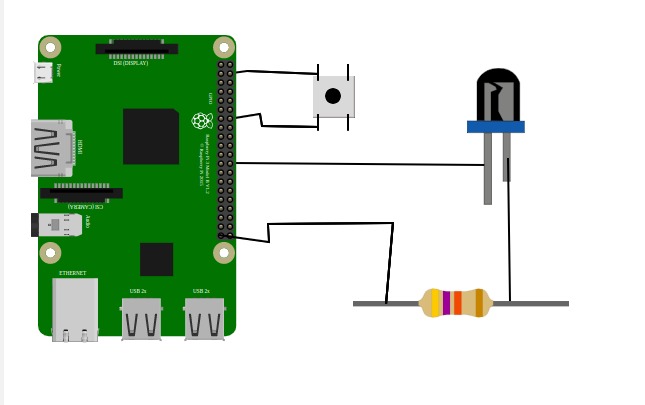
Instructions

  • Click on the components to start interacting with them in the connection area
  • Hover over the Raspberry Pi connections to get information about various connection pins
  • Double click on various connection points to make connections
  • Double click on the empty space in the connection area to extend and bend wire connections

How to Connect

connection_diagram
  1. Connect any of the Button pin to any of the GPIO pin of Raspberry Pi
  2. Connect the other pin of the button to any of the GND pins of the Raspberry Pi.
  3. Connect any of the GPIO pins of Raspberry Pi to Led's anode pin.
  4. The pin requires low voltage, connect any of the resistor pin to Led's cathode
  5. Connect the other resistor's pin to any of the GND pins of Raspberry Pi
  6. Click the push button to activate the LED after completing the connections.
  7. Enter the GPIO pin number of the button and led to the code section, and select the LED color. The code section can be opened by clicking the Code button on the right upper side of the simulation area.

Connections Logs

    Raspberry Pi
    Led bulb
    Resistor
    Push Button
    Hover over a component to see its description.

    CONNECTOR INFO
          import RPi.GPIO as GPIO
          import time
          button =   
          
    led =
    LED_COLOR = def setup(): GPIO.setmode(GPIO.BOARD) GPIO.setup(button, GPIO.IN, pull_up_down=GPIO.PUD_UP) GPIO.setup(led, GPIO.OUT) def loop(): while True: button_state = GPIO.input(button) if button_state == False: GPIO.output(led, True) print('Button Pressed...') while GPIO.input(button) == False: time.sleep(0.2) else: GPIO.output(led, False) def endprogram(): GPIO.output(led, False) GPIO.cleanup() if __name__ == '__main__': setup() try: loop() except KeyboardInterrupt: print('keyboard interrupt detected') endprogram()